友情提示:
centos5下安装花生壳(phlinux-2.0_src)
1、安装必要的开发包
[root@src src]# yum install gcc gcc-c++ autoconf automake
2、下载phlinux-2.0_src.tar.gz
[root@src src]# wget http://download.oray.com/phlinux-2.0_src.tar.gz
3、解压所有文件
&...
控制ssh连接时间(转)
公司刚换了成电信的网络,啥也不没有改过,连上服务器后,如果超过30s左右没有动,就自动断开
我想就此问题和大家探讨一下。
原因分析:a packet filter or NAT device timing out your TCP connection due to inactivity
一般由于我们的tcp连接没有活动而被firewall认为超时中断了会话。
Many NAT firewalls time out idle sessions after a certain period of time to keep their trunks clean. Sometimes the interval between session drops is 24 hours, but on many commodity firewalls, connections are killed after as little as 300 seconds.
解决方法:
#vi /etc/ssh/ssh_config
添加以下两行:
ServerAliveInterval 300
ServerAliveCountMax 2
不过在官方FAQ中看到ServerAliveInterval 只能在OpenSSH 3.8 and newer才能使用。
windows2003 64位整合IIS+PHP+MYSQL
其实以前整合过的,但最近重新在东南亚的服务器上进行整合的时候,居然会搞这么久,没办法只好写个教程记录下来.
需要的软件有:
windows 2003 iis 6.0 64位(因为系统就是64的,用他自带的也是64位)
PHPx64.zip (php的64位包不好找,所以我会提供个地址给大家下,让iis处于32位下的话会出现很多问题,毕竟我这是在生产服务器上用)
mysql-5.5.15-winx64.msi (mysql的64位包可以去mysql官网上下)
上面说的软件都是windows下的,大家不要去找linux下的,我想.....
vps Linode提供了一个用于低内存服务器的MySQL内存占用优化建议,可以用来参考(转)
Linode提供了一个用于低内存服务器的MySQL内存占用优化建议,可以用来参考。
配置文件:/etc/my.cnf
[mysqld]
datadir=/var/lib/mysql
socket=/var/lib/mysql/mysql.sock
user=mysql
# Default to using old password format for compatibility with mysql 3.x
# clients (those using the mysqlclient10 compatibility package).
old_passwords=1
# Low memory optimizations
skip-bdb
skip-innodb
skip-networking
server-id = 1
key_buffer = 256K
max_allowed_packet=1M
thread_stack = 64K
table_cache = 4
sort_buffer_size = 64K
read_buffer_size = 256K
read_rnd_buffer_size = 256K
net_buffer_length = 2K
thread_stack = 64K
query_cache_limit=256K
query_cache_size = 2M
[mysqld_safe]
log-error=/var/log/mysqld.log
pid-file=/var/run/my
yum安装apache+php+mysql+tomcat
上次给大家介绍nginx和tomcat的整合,其实apache和tomcat的整合更简单,好了,看教程吧.
系统:centos 5.5
ip:192.168.9.133
1. 安装Apahce, PHP, Mysql, 以及php连接mysql库组件。
yum -y install httpd php mysql mysql-server php-mysql tomcat5 tomcat5-webapps tomcat5-admin-webapps
2. 配置开机启动服务
/sbin/chkconfig httpd on [设置apache服务器httpd服务开机启动]
/sbin/chkconfig --add mysqld [在服务清单中添加mysql服务]
/sbin/chkconfig mysqld on [设置mysql服务开机启动]
/sbin/service httpd start [启动httpd服务,与开机启动无关]
/sbin/service mysqld start [启动mysql服务,与开机无关]
3. 非常的重要!设置mysql数据库root帐号密码。
mysqladmin -u root password 'new-password' [引号内填密码]
4. 让mysql数据库更安全
mysql -u root -p
mysql> DROP DATABASE test; [删除test数据库]
mysql> DELETE FROM mysql.user WHERE user = ''; [删除匿名帐户]
mysql> FLUSH PRIVILEGES; [重载权限]
5. 按照以上的安装方式, 配置出来的站点目录为/var/www/html/
新建一个php脚本测试一下吧, 写个phpinfo程序放到站点根目录. 例子:
<?php
phpinfo();
?>
centos搭建nginx+jdk+tomcat环境
在centos中安装nginx+jdk+tomcat环境是越来越简单,以前安装所有的包都要编译安装,现在就不用那么麻烦了.具体操作看下面:
系统:centos 5.6
需要的软件包:apache-tomcat-7.0.19.tar.gz,jdk-6u1-linux-i586.bin
1.先yum安装nginx
vi /etc/yum.repos.d/tt.repo
放入如下内容
[CentALT]
name=CentALT Packages for Enterprise Linux 5 - $basearch
baseurl=http://centos.alt.ru/repository/centos/5/$basearch/
enabled=1
gpgcheck=0
protect=1
i386:
rpm -ihv http://download.fedora.redhat.com/pub/epel/5/i386/epel-release-5-4.noarch.rpm
x86_64:
rpm -ihv http://download.fedora.redhat.com/pub/epel/5/x86_64/epel-release-5-4.noarch.rpm
yum -y install nginx mysql-server php-fpm php-cli php-pdo php-mysql php-mcrypt php-mbstring php-gd php-tidy php-xml php-xmlrpc php-pear php-pecl-memcache php-eaccelerator
这里我们不用安装得这么多,只需要nginx
yum -y install nginx
2.安装jdk
chmod +x jdk-6u1-linux-i586.bin
./jdk-6u1-linux-i586.bin
mv jdk1.6.0_01/ /usr/local/jdk
附件下载:
nginx.rar 1.24KB
nginx缓存设置
目的: 缓存nginx服务器的静态文件。如css,js,htm,html,jpg,gif,png,flv,swf,这些文件都不是经常更新。便于缓存以减轻服务器的压力。
实现: nginx proxy_cache可以将用户的请缓存到本地一个目录,当下一个请求时可以直接调取缓存文件,就不用去后端服务器去取文件了。
配置: 打开配置文件/etc/nginx/nginx.conf
user www www;
worker_processes 2;
error_log /var/log/nginx/nginx_error.log crit;
worker_rlimit_nofile 65535;
events
{
use epoll;
worker_connections 65535;
}
http
{
include mime.types;
default_type application/octet-stream;
server_names_hash_bucket_size 128;
client_header_buffer_size 32k;
large_client_header_buffers 4 32k;
client_max_body_size 8m;
sendfile on;
tcp_nopush on;
keepalive_timeout 0;
tcp_nodelay on;
fastcgi_connect_timeout 300;
fastcgi_send_timeout 300;
fastcgi_read_timeout 300;
fastcgi_buffer_size 64k;
fastcgi_buffers 4 64k;
fastcgi_busy_buffers_size 128k;
fastcgi_temp_file_write_size 128k;
##cache##
proxy_connect_timeout 5;
proxy_read_timeout 60;
proxy_send_timeout 5;
proxy_buffer_size 16k;
编译安装varnish出错解决办法
本来是打算研究nginx+varnish的,没想到我居然在编译安装varnish的时候出错,想起以前研究varnish反向代理出现过相同的问题,所以解决起来很快,看来有时候解决过的问题还是要保存起来,免得下次忘了又去到处找.
系统:centos 5.5
软件:varnish-2.1.5.tar.gz
编译安装出现的错误:
configure: WARNING: xsltproc not found ?not building documentation
checking for rst2man... no
checking for rst2man.py... no
configure: WARNING: rst2man not found ?not building man pages
checking for clock_gettime in -lrt... yes
checking for dlopen in -ldl... yes
checking for library containing initscr... no
configure: WARNING: curses not found; some tools will not be built
checking for library containing pthread_create... -lpthread
checking for socket in -lsocket... no
checking for getaddrinfo in -lnsl... yes
checking for cos in -lm... yes
checking for pkg-config... no
checking for PCRE... no
configure: error: in `/root/varnish-2.1.5':
configure: error: The pkg-config script could not be found or is too old. Make sure it
is in your PATH or set the PKG_CONFIG environment variable to the full
path to pkg-config.
Alternatively, you may set the environment variables PCRE_CFLAGS
and PCRE_LIBS to avoid the need to call pkg-config.
See the pkg-config man page for more details.
To get pkg-config, see <http://pkg-config.freedesktop.org/>.
See `config.log' for more details
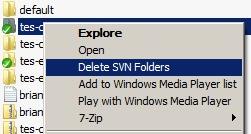
Windows下批量删除.svn文件夹方法
我想大家在做好一些代码或者网站页面的时候,上传到服务器上会有.svn这个文件夹在里面烦着你,一个一个的删是很浪费时间的,下面给大家一个简单的,快速批量删除这些.svn.
建立一个文本文件,取名为 kill-svn-folders.reg (扩展名由 txt 改为 reg ),内容如下:
Windows Registry Editor Version 5.00
[HKEY_LOCAL_MACHINE\SOFTWARE\Classes\Folder\shell\DeleteSVN]
@="Delete SVN Folders"
[HKEY_LOCAL_MACHINE\SOFTWARE\Classes\Folder\shell\DeleteSVN\command]
@="cmd.exe /c \"TITLE Removing SVN Folders in %1 && COLOR 9A && FOR /r \"%1\" %%f IN (.svn) DO RD /s /q \"%%f\" \""
保存之后,双击这个 reg 文件。成功后,在每一个文件夹上点击右键都会有一个 “Delete SVN Folders” 的选项,点击之后,既可以删除这个文件下下面所有的 .svn 文件了:
附件下载:
kill-svn-folders.rar 399字节
1分钟完美安装最新Lighttpd + PHP-FPM + MySQL
首先要感谢21andy和守住每一天,没有他们俩的贡献,也就没有我这篇文章,我根据他们的1分钟完美安装最新centos+nginx+php-fpm+mysql文章内容改编.
我看了他们的文章之后,想lighttpd可不可以替换nginx来和php-fpm,mysqld整合,因为毕竟都是webserver,实验证明我的想法是正确的.好了,废话不多说,看教程吧.
系统:centos 5.5
ip:192.168.13.200
新建repo
vi /etc/yum.repos.d/test.repo
test.repo里的内容:
[CentALT]
name=CentALT Packages for Enterprise Linux 5 - $basearch
baseurl=http://centos.alt.ru/repository/centos/5/$basearch/
enabled=1
gpgcheck=0
protect=1
这里我用的是守住提供的yum源,这个yum源更新比较快.
地址是:
http://centos.alt.ru/pub/repository/centos/5/i386/
http://centos.alt.ru/pub/repository/centos/5/x86_64/
根据你系统是32还是64位来选择.
启用 EPEL repo:
i386(也就是32位的系统):
rpm -ihv http://download.fedora.redhat.com/pub/epel/5/i386/epel-release-5-4.noarch.rpm
x86_64(这个就不解释,应该都看得懂,猜也猜得到):
rpm -ihv http://download.fedora.redhat.com/pub/epel/5/x86_64/epel-release-5-4.noarch.rpm
因为gpgcheck=0,所以就不用导入key了.
yum更新时,发生错误的解决方法(转)
忘了是从那个站看到的了,只要是有用的就可以转过来
There are unfinished transactions remaining. You might consider running yum-complete-transaction first to finish them.
The program yum-complete-transaction is found in the yum-utils package.
意思是,有未完成的yum事务,建议先运行yum-complete-transaction命令清除。
处理步骤:
# 安装 yum-complete-transaction

yum install yum-utils

# 运行 yum-complete-transaction

yum-complete-transaction --cleanup-only

# 清除可能存在的重复包

package-cleanup --dupes

# 清除可能存在的损坏包

package-cleanup --problems
定制squid错误页面
我不知道大家有没有这样想法,反正当我看到squid的默认错误页面时,就有想改成比较有自己个性的错误页面.其实很简单,可能大家平时都没有注意到吧.
系统:centos 5.5
ip:192.168.13.200
1.查找squid的错误页面
一般squid的错误是在/usr/share/squid/errors/,你们也可以查看squid.conf中的error_directory选项,就可以知道.我的是在/usr/share/squid/errors/里.
2.进入错误页面文件夹
cd /usr/share/squid/errors/
如果是yum安装的squid,可以看到里面有很多语言的错误文件夹,如果是自己编译安装的话,那就要看你们这2个选项是怎么配置的了
--enable-err-languages
--enable-default-err-language
其中--enable-err-languages是最关键的,--enable-err-languages="English Simplify_Chinese",以空格分隔,这样就只生成2个错误文件夹.
3.修改错误页面
我的squid的错误页面是中文的,所以就只下载Simplify_Chinese这个文件夹,然后把里面的文件一个一个的换成自己认为比较有个性的就可以.
好了,很简单吧,大家都自己动手去修改吧.
本网站和支付宝达成战略伙伴的活动

赞助本站

赞助本站

最新评论
-
 lshell
好多年没有玩ROS了, 最近一直想折腾, -
 rocdk890
@Michael:你的pve版本是多少的 -
 Michael
lxc.apparmor.profile - Michael
这个是对的,可以解决LXC的zeroti -
 ade
ade
亲测有效,试了多个方法,就这个好使! - rocdk890
@西门堵车:我建议你还是试试,pve的l -
 西门堵车
西门堵车
之前折腾了一次,没有成功 现在又没心思 -
 朱祁镇
朱祁镇
削足适履就是了。 sshd为了安全弃用 -
 r1p
r1p
牛比,找了那麽多文章,就佬的最直接实用{ - rocdk890
@milton010:不好意思,你这个问