centos搭建nginx+jdk+tomcat环境
在centos中安装nginx+jdk+tomcat环境是越来越简单,以前安装所有的包都要编译安装,现在就不用那么麻烦了.具体操作看下面:
系统:centos 5.6
需要的软件包:apache-tomcat-7.0.19.tar.gz,jdk-6u1-linux-i586.bin
1.先yum安装nginx
vi /etc/yum.repos.d/tt.repo
放入如下内容
[CentALT]
name=CentALT Packages for Enterprise Linux 5 - $basearch
baseurl=http://centos.alt.ru/repository/centos/5/$basearch/
enabled=1
gpgcheck=0
protect=1
i386:
rpm -ihv http://download.fedora.redhat.com/pub/epel/5/i386/epel-release-5-4.noarch.rpm
x86_64:
rpm -ihv http://download.fedora.redhat.com/pub/epel/5/x86_64/epel-release-5-4.noarch.rpm
yum -y install nginx mysql-server php-fpm php-cli php-pdo php-mysql php-mcrypt php-mbstring php-gd php-tidy php-xml php-xmlrpc php-pear php-pecl-memcache php-eaccelerator
这里我们不用安装得这么多,只需要nginx
yum -y install nginx
2.安装jdk
chmod +x jdk-6u1-linux-i586.bin
./jdk-6u1-linux-i586.bin
mv jdk1.6.0_01/ /usr/local/jdk
编辑profile文件,设置开机文件java开机执行环境文件
vi /etc/profile
在文件的末尾增加如下内容
JAVA_HOME="/usr/local/jdk"
CLASS_PATH="$JAVA_HOME/lib:$JAVA_HOME/jre/lib"
PATH=".:$PATH:%JAVA_HOME/bin"
CATALINA_HOME="/usr/local/tomcat"
export JAVA_HOME CATALINA_HOME
保存并退出vi,执行以下命令使配置生效
source /etc/profile
3.安装apache-tomcat
先创建网站目录
mkdir -p /var/www/vhosts/wwwroot
下载apache-tomcat
http://apache.etoak.com/tomcat/tomcat-7/v7.0.19/bin/apache-tomcat-7.0.19.tar.gz
tar zxf apache-tomcat-7.0.19.tar.gz
mv apache-tomcat-7.0.19 /usr/local/tomcat
cp -R /usr/local/tomcat/webapps/* /var/www/vhosts/wwwroot/
配置tomcat的server.xml文件,并启动或停止tomcat:
vi /usr/local/tomcat/conf/server.xml
查找appBase="webapps",修改appBase="/var/www/vhosts/wwwroot"
启动tomcat的命令
/usr/local/tomcat/bin/startup.sh
停止tomcat的命令
/usr/local/tomcat/bin/shutdown.sh
4.nginx整合tomcat
vi /etc/nginx/nginx.conf
nginx.conf里内容:
user nginx;
worker_processes 1;
error_log /var/log/nginx/error.log;
pid /var/run/nginx.pid;
events {
use epoll;
worker_connections 65535;
}
http {
include /etc/nginx/mime.types;
default_type application/octet-stream;
log_format main '$remote_addr - $remote_user [$time_local] "$request" '
'$status $body_bytes_sent "$http_referer" '
'"$http_user_agent" "$http_x_forwarded_for"';
access_log /var/log/nginx/access.log main;
server_names_hash_bucket_size 128;
client_header_buffer_size 32k;
large_client_header_buffers 4 32K;
client_max_body_size 8m;
sendfile on;
tcp_nopush on;
keepalive_timeout 65;
#tomcat add start<<
tcp_nodelay on;
client_body_buffer_size 512k;
proxy_connect_timeout 5;
proxy_read_timeout 60;
proxy_send_timeout 5;
proxy_buffer_size 16k;
proxy_buffers 4 64k;
proxy_busy_buffers_size 128k;
proxy_temp_file_write_size 128k;
#tomcat add end>>
gzip on;
gzip_min_length 1k;
gzip_buffers 4 16k;
gzip_http_version 1.1;
gzip_comp_level 2;
gzip_types text/plain application/x-javascript text/css application/xml;
gzip_vary on;
#tomcat add start<<
upstream tomcat_server {
server 127.0.0.1:8080;
}
#tomcat add end>>
server {
listen 80;
server_name _;
#charset koi8-r;
#access_log logs/host.access.log main;
location / {
root /var/www/vhosts/wwwroot;
index index.html index.htm index.jsp default.jsp index.do default.do;
}
#tomcat add start<<
if (-d $request_filename)
{
rewrite ^/(.*)([^/])$http://$host/$1$2/ permanent;
}
location ~ \.(jsp|jspx|do)?$ {
proxy_set_header Host $host;
proxy_set_header X-Forwarded-For $remote_addr;
proxy_pass http://tomcat_server;
}
#tomcat add end>>
error_page 404 /404.html;
location = /404.html {
root /var/www/vhosts/error;
}
# redirect server error pages to the static page /50x.html
#
error_page 500 502 503 504 /50x.html;
location = /50x.html {
root /var/www/vhosts/error;
}
# proxy the PHP scripts to Apache listening on 127.0.0.1:80
#
#location ~ \.php$ {
# proxy_pass http://127.0.0.1;
#}
# pass the PHP scripts to FastCGI server listening on 127.0.0.1:9000
#
#ocation ~ \.php$ {
# root html;
# fastcgi_pass 127.0.0.1:9000;
# fastcgi_index index.php;
# fastcgi_param SCRIPT_FILENAME /www$fastcgi_script_name;
# include fastcgi_params;
#}
# deny access to .htaccess files, if Apache’s document root
# concurs with nginx’s one
#
#location ~ /\.ht {
# deny all;
#}
}
# Load config files from the /etc/nginx/conf.d directory
include /etc/nginx/conf.d/*.conf;
}
有点乱,自己整理下就好看了.
5.测试
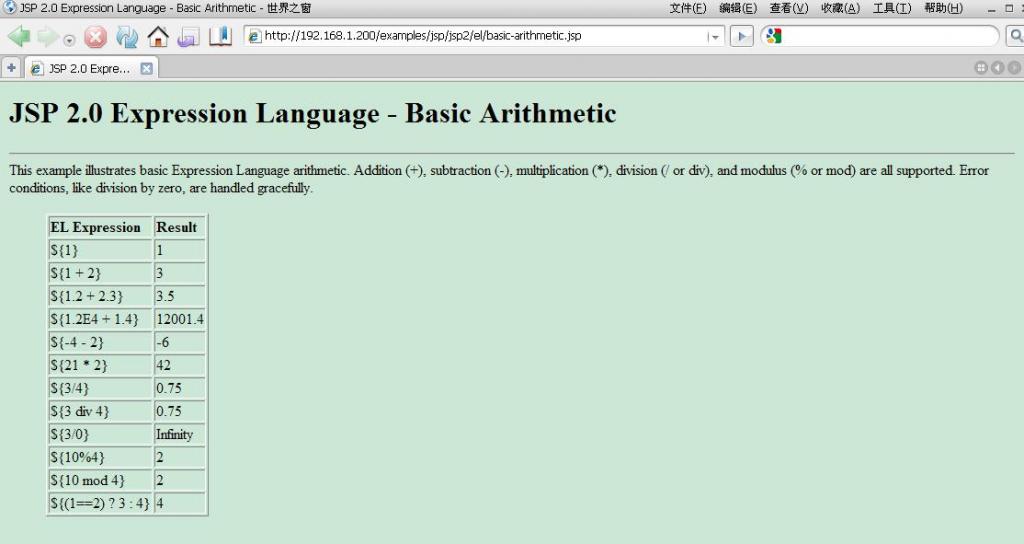
访问http://ip/examples/jsp/jsp2/el/basic-arithmetic.jsp
看到下面的图就表示正常.
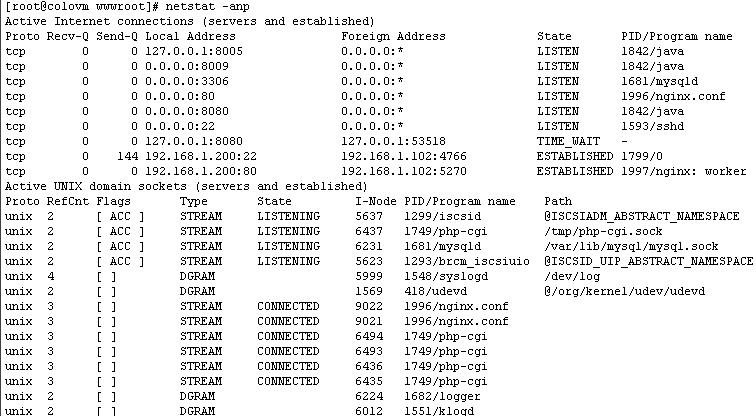
再来netstat看看
好,看来成功了.最后把nginx的配置文件发给大家.ps:请先看完教程再留你们的问题.
附件下载:
nginx.rar 1.24KB


===
MYSQL集群的话,是能直接连接主MYSQL啊,要是这台挂了,就不行了,有一个虚似IP的,通过他再均衡的分发MYSQL的。我就是不知道如何做这步。
我现在是在学习中,最近学了一个MSYQL集群的配置,通过mysql-cluster方式。他能实现任意一台更新记录其他MYSQL也能同步,所以应用于主从,或读写分离都行的。可是我不知道如何创建一个虚似的IP,通过它,TOMCAT中的连接池访问数据库,这个虚似IP再均衡的找一台MYSQL。
最近我在学习怎么用nginx配置TOMCAT集群和MYSQL集群,您可以发表一篇文章吗?您可以加我QQ吗?215377150,祝您工作顺利。