用tcmalloc优化nginx
上一篇文章我做了编译安装nginx并修改版本头信息,那这次就写让nginx支持tcmalloc,废话不多说了,看教程吧.
系统:centos 5.6
需要的软件包: google-perftools-1.7.tar.gz
1.下载并解压tcmalloc
wget http://google-perftools.googlecode.com/files/google-perftools-1.7.tar.gz
tar zxf google-perftools-1.7.tar.gz && cd google-perftools-1.7
2.编译安装
./configure && make && make install
echo "/usr/local/lib" > /etc/ld.so.conf.d/usr_local_lib.conf
/sbin/ldconfig
3.让tcmalloc加入nginx中
cd ../nginx-1.0.6
./configure --user=nginx --group=nginx --add-module=../ngx_cache_purge-1.3 --add-module=../nginx-accesskey-2.0.3 --prefix=/usr/share/nginx --sbin-path=/usr/sbin/nginx --conf-path=/etc/nginx/nginx.conf --error-log-path=/var/log/nginx/error.log --http-log-path=/var/log/nginx/access.log --http-client-body-temp-path=/var/lib/nginx/tmp/client_body --http-proxy-temp-path=/var/lib/nginx/tmp/proxy --http-fastcgi-temp-path=/var/lib/nginx/tmp/fastcgi --pid-path=/var/run/nginx.pid --lock-path=/var/lock/subsys/nginx --with-http_secure_link_module --with-http_random_index_module --with-http_ssl_module --with-http_realip_module --with-http_addition_module --with-http_sub_module --with-http_dav_module --with-http_flv_module --with-http_gzip_static_module --with-http_stub_status_module --with-http_perl_module --with-http_geoip_module --with-mail --with-mail_ssl_module --with-google_perftools_module --with-ld-opt='-ltcmalloc_minimal' --with-cc-opt='-O3' --with-cpu-opt=opteron
这里说下默认nginx使用的GCC编译参数是-O,需要更加优化可以使用以下两个参数:
--with-cc-opt='-O3'
使用-O2以及以上的参数,可以微量增加性能1%左右,而O2和O3基本可以认为是相同的,但我更喜欢-03.
--with-cpu-opt=*
具体是什么cpu可以cat /proc/cpuinfo | grep name | cut -f2 -d: | uniq -c查看,如果是inter xeon,就写--with-cpu-opt=pentium,如果是AMD,就写--with-cpu-opt=opteron 这样编译针对特定CPU以及增加GCC的优化.
我所用这台机器的cpu是 2 AMD Athlon(tm) II X2 240 Processor,可以看到是双核心的amd cpu,所以我用的就是--with-cpu-opt=opteron.
然后执行
make
如果你是第一次安装nginx的就可以继续执行
make install
如果你已经装过nginx了并且版本比现在低或者和现在的版本一样,那你就可以不用执行make install,只需要执行下面的命令:
cp /usr/sbin/nginx /usr/sbin/nginx.old
cp objs/nginx /usr/sbin/nginx
覆盖之后执行
service nginx restart
然后再执行
nginx -V

可以看到已经支持了,然后再来执行
lsof -n|grep tcmalloc
没有lsof的运行yum -y install lsof
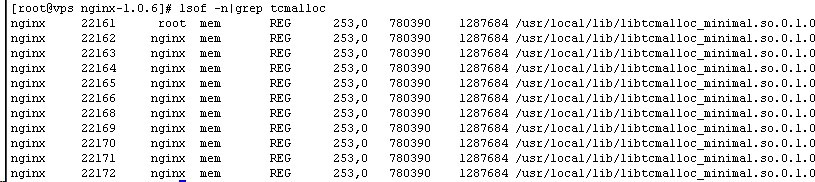
这里因为默认的nginx.conf文件里开的nginx进程是10个,所以可以看到tcmalloc对nginx的优化有这么多.再对nginx.conf配置文件进行修改
vi /etc/nginx/nginx.conf
在pid下加入一行,如下图
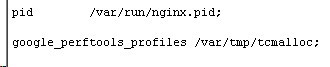
再重启nginx,进入到/var/tmp下看有没有下图的文件
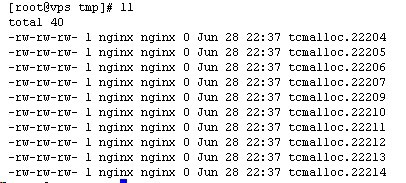
如果有就表示成功了,如果没有那就检查上面执行的步骤,网上有人说tcmalloc对nginx的优化效果不是很明显,这个情况就根据你们自己的环境来选择了.


[root@NGINX02 ~]# cd /tmp/nginx-1.0.11
[root@NGINX02 nginx-1.0.11]# ./configure --prefix=/etc/nginx/ \
> --with-google_perftools_module
checking for Google perftools ... found <----真的有抓到
但下面nginx -V就是沒有這個with.....
[root@NGINX02 nginx-1.0.11]# nginx -V
nginx version: nginx/1.0.11
built by gcc 4.4.4 20100726 (Red Hat 4.4.4-13) (GCC)
TLS SNI support enabled
configure arguments: --prefix=/etc/nginx/ --sbin-path=/usr/sbin/nginx --conf-path=/etc/nginx/nginx.conf --error-log-path=/var/log/nginx/error.log --http-log-path=/var/log/nginx/access.log --pid-path=/var/run/nginx.pid --lock-path=/var/run/nginx.lock --http-client-body-temp-path=/var/cache/nginx/client_temp --http-proxy-temp-path=/var/cache/nginx/proxy_temp --http-fastcgi-temp-path=/var/cache/nginx/fastcgi_temp --http-uwsgi-temp-path=/var/cache/nginx/uwsgi_temp --http-scgi-temp-path=/var/cache/nginx/scgi_temp --user=nginx --group=nginx --with-http_ssl_module --with-http_realip_module --with-http_addition_module --with-http_sub_module --with-http_dav_module --with-http_flv_module --with-http_mp4_module --with-http_gzip_static_module --with-http_random_index_module --with-http_secure_link_module --with-http_stub_status_module --with-mail --with-mail_ssl_module --with-file-aio --with-ipv6 --with-cc-opt='-O2 -g'
[root@NGINX02 nginx-1.0.11]#
[root@NGINX02 ~]# uname -a
Linux NGINX02 2.6.32-131.0.15.el6.x86_64 #1 SMP Sat Nov 12 15:11:58 CST 2011 x86_64 x86_64 x86_64 GNU/Linux
[root@NGINX02 ~]#
另,做了./configure --with-google_perftools_module 之後,nginx -V裡面也沒有顯示 --with-google_perftools_module 這行,是哪裡做錯了?
值得学习
博客怎么也弄拿福能呢~