nginx安装etag模块
HTTP 协议规格说明定义ETag为"被请求变量的实体标记".简单点即服务器响应时给请求URL标记,并在HTTP响应头中将其传送到客户端,类似服务器端返回的格式:
Etag: "5d8c72a5edda8d6a:3239″
客户端的查询更新格式是这样的:
If-None-Match: "5d8c72a5edda8d6a:3239″
如果ETag没改变,则返回状态304.
即:在客户端发出请求后,Http Reponse Header中包含 Etag: "5d8c72a5edda8d6a:3239″
标识,等于告诉Client端,你拿到的这个的资源有表示ID:5d8c72a5edda8d6a:3239.当下次需要发Request索要同一个URI的时候,浏览器同时发出一个If-None-Match报头( Http RequestHeader)此时包头中信息包含上次访问得到的Etag: "5d8c72a5edda8d6a:3239″标识.
If-None-Match: "5d8c72a5edda8d6a:3239"
,这样,Client端等于Cache了两份,服务器端就会比对2者的etag.如果If-None-Match为False,不返回200,返回304 (Not Modified) Response.
系统:centos 5.x
需要的软件:git nginx-static-etags模块包
1.安装git
如果你服务器上没有安装git,可以去参看这篇文章centos下两种方法安装git.
2.下载nginx-static-etags模块包
git clone git://github.com/mikewest/nginx-static-etags.git ./nginx-static-etags
3.编译安装
cd /root/install/nginx-static-etags
echo ''>>ngx_http_static_etags_module.c 加一空行,否则编译会报错,这个是nginx-static-etags的bug
cd /root/install/nginx-1.2.x
./configure --user=www --group=www --add-module=../ngx_cache_purge-1.3 --add-module=../nginx-accesskey-2.0.3 \
--add-module=../memc-nginx-module --add-module=../srcache-nginx-module --add-module=../nginx-static-etags/ --prefix=/usr/share/nginx \
--sbin-path=/usr/sbin/nginx --conf-path=/etc/nginx/nginx.conf --error-log-path=/var/log/nginx/error.log \
--http-log-path=/var/log/nginx/access.log --http-client-body-temp-path=/var/lib/nginx/tmp/client_body \
--http-proxy-temp-path=/var/lib/nginx/tmp/proxy --http-fastcgi-temp-path=/var/lib/nginx/tmp/fastcgi \
--pid-path=/var/run/nginx.pid --lock-path=/var/lock/subsys/nginx --with-http_secure_link_module \
--with-http_random_index_module --with-http_ssl_module --with-http_realip_module --with-http_addition_module \
--with-http_sub_module --with-http_dav_module --with-http_flv_module --with-http_gzip_static_module \
--with-http_stub_status_module --with-http_perl_module --with-http_geoip_module --with-mail \
--with-mail_ssl_module --with-google_perftools_module --with-ld-opt=-ltcmalloc_minimal
make
make install
4.配置nginx
vi /etc/nginx/nginx.conf
最好是添加到你虚拟主机的server配置里.
location ~ .*/.(gif|jpg|jpeg|png|bmp|ico|rar|css|js|zip|xml|txt|flv|swf|mid|doc|cur|xls|pdf|txt|)$ {
FileETag on;
etag_format "%X%X";
expires 30d;
}
重启nginx后,进行验证
curl --head https://blog.slogra.com/xx/swfobject.js
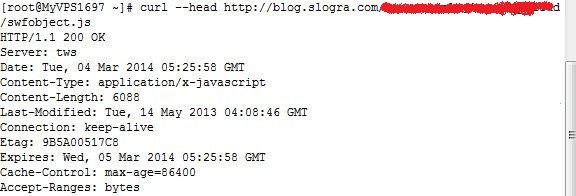
可以看到已经有etag的标识了.
Etag: "5d8c72a5edda8d6a:3239″
客户端的查询更新格式是这样的:
If-None-Match: "5d8c72a5edda8d6a:3239″
如果ETag没改变,则返回状态304.
即:在客户端发出请求后,Http Reponse Header中包含 Etag: "5d8c72a5edda8d6a:3239″
标识,等于告诉Client端,你拿到的这个的资源有表示ID:5d8c72a5edda8d6a:3239.当下次需要发Request索要同一个URI的时候,浏览器同时发出一个If-None-Match报头( Http RequestHeader)此时包头中信息包含上次访问得到的Etag: "5d8c72a5edda8d6a:3239″标识.
If-None-Match: "5d8c72a5edda8d6a:3239"
,这样,Client端等于Cache了两份,服务器端就会比对2者的etag.如果If-None-Match为False,不返回200,返回304 (Not Modified) Response.
系统:centos 5.x
需要的软件:git nginx-static-etags模块包
1.安装git
如果你服务器上没有安装git,可以去参看这篇文章centos下两种方法安装git.
2.下载nginx-static-etags模块包
git clone git://github.com/mikewest/nginx-static-etags.git ./nginx-static-etags
3.编译安装
cd /root/install/nginx-static-etags
echo ''>>ngx_http_static_etags_module.c 加一空行,否则编译会报错,这个是nginx-static-etags的bug
cd /root/install/nginx-1.2.x
./configure --user=www --group=www --add-module=../ngx_cache_purge-1.3 --add-module=../nginx-accesskey-2.0.3 \
--add-module=../memc-nginx-module --add-module=../srcache-nginx-module --add-module=../nginx-static-etags/ --prefix=/usr/share/nginx \
--sbin-path=/usr/sbin/nginx --conf-path=/etc/nginx/nginx.conf --error-log-path=/var/log/nginx/error.log \
--http-log-path=/var/log/nginx/access.log --http-client-body-temp-path=/var/lib/nginx/tmp/client_body \
--http-proxy-temp-path=/var/lib/nginx/tmp/proxy --http-fastcgi-temp-path=/var/lib/nginx/tmp/fastcgi \
--pid-path=/var/run/nginx.pid --lock-path=/var/lock/subsys/nginx --with-http_secure_link_module \
--with-http_random_index_module --with-http_ssl_module --with-http_realip_module --with-http_addition_module \
--with-http_sub_module --with-http_dav_module --with-http_flv_module --with-http_gzip_static_module \
--with-http_stub_status_module --with-http_perl_module --with-http_geoip_module --with-mail \
--with-mail_ssl_module --with-google_perftools_module --with-ld-opt=-ltcmalloc_minimal
make
make install
4.配置nginx
vi /etc/nginx/nginx.conf
最好是添加到你虚拟主机的server配置里.
location ~ .*/.(gif|jpg|jpeg|png|bmp|ico|rar|css|js|zip|xml|txt|flv|swf|mid|doc|cur|xls|pdf|txt|)$ {
FileETag on;
etag_format "%X%X";
expires 30d;
}
重启nginx后,进行验证
curl --head https://blog.slogra.com/xx/swfobject.js
可以看到已经有etag的标识了.


评论: