mysql编译安装并配置主从复制
看了很多网上教程,想自己配置下,所以就有了下面这篇教程.
系统:centos 5.5
主ip:192.168.10.5
从ip:192.168.10.6
1.在主服务器上编译安装mysql
wget http://dev.mysql.com/get/Downloads/MySQL-5.1/mysql-5.1.61.tar.gz/from/http://mysql.he.net/
yum -y install gcc gcc-c++ autoconf libjpeg libjpeg-devel libpng libpng-devel \
freetype freetype-devel libxml2 libxml2-devel zlib zlib-devel \
glibc glibc-devel glib2 glib2-devel bzip2 bzip2-devel \
ncurses ncurses-devel curl curl-devel vim ntsysv make libtool
CFLAGS="-O3" CXX=gcc CXXFLAGS="-O3 -felide-constructors -fno-exceptions -fno-rtti -fomit-frame-pointer -ffixed-ebp" \
./configure --prefix=/usr/local/mysql/ --localstatedir=/usr/local/mysql/data \
--without-debug --with-unix-socket-path=/tmp/mysql.sock --with-client-ldflags=-all-static --with-mysqld-ldflags=-all-static \
--enable-assembler --with-charset=utf8 --with-collation=utf8_general_ci --with-extra-charsets=all \
--with-readline --enable-local-infile --enable-thread-safe-client --with-big-tables
在编译的时候如果出现/bin/rm: cannot remove `libtoolt': No such file or directory,那可以去看看我的这篇Mysql安装:/bin/rm: cannot remove `libtoolt': No such file or directory的解决方法.
make && make install
useradd -s /sbin/nologin mysql
cp -f support-files/my-large.cnf /etc/my.cnf
/usr/local/mysql/bin/mysql_install_db --user=mysql
chown -R root /usr/local/mysql
chown -R mysql /usr/local/mysql/data
chgrp -R mysql /usr/local/mysql
/usr/local/mysql/bin/mysqld_safe --user=mysql &
cp support-files/mysql.server /etc/rc.d/init.d/mysqld
chown root.root /etc/rc.d/init.d/mysqld
chmod 755 /etc/rc.d/init.d/mysqld
chkconfig --add mysqld
chkconfig mysqld on
cat > /etc/ld.so.conf.d/mysql.conf<<EOF
/usr/local/mysql/lib/mysql
/usr/local/lib
EOF
ldconfig
ln -s /usr/local/mysql/lib/mysql /usr/lib/mysql
ln -s /usr/local/mysql/bin/mysql /usr/bin
ln -s /usr/local/mysql/bin/mysqladmin /usr/bin
service mysqld restart
service mysqld status
mysqladmin -u root password 'new-password'
mysql -u root -p
use mysql;
select Host,User,Password,Select_priv,Grant_priv from user;
delete from mysql.user where not (user='root') ;
delete from mysql.user where user='';
delete from user where user='';
delete from user where password='';
delete from user where host='';
drop database test;
delete from db;
flush privileges;
好了,这些做完就可以把主服务器上的mysql打包,传到从服务器上了,从服务器上就不用编译了,只需要做后面几步.
2.在主从服务器上创建复制账号
GRANT REPLICATION SLAVE,REPLICATION CLIENT ON *.* TO 'dbmysql'@'192.168.10.%' IDENTIFIED BY '123456';
当然你也可以:
GRANT REPLICATION SLAVE,REPLICATION CLIENT ON *.* TO 'dbmysql'@'%' IDENTIFIED BY '123456';


添加完账号后,刷新下权限
flush privileges;
然后用iptables来限制只让那几台服务器来访问mysql.
3.配置主从配置文件
主的:
在/etc/my.cnf的[mysqld]后追加
server_id = 5
log_bin = mysql-bin
log_bin_index = mysql-bin.index
sync_binlog = 1
max_binlog_size = 20M
从的:
server_id = 6
log_bin = mysql-bin
log_bin_index = mysql-bin.index
log_slave_updates = 1
relay_log = mysql-relay-bin
relay_log_index = mysql-relay-bin.index
max_binlog_size = 20M
read_only = 1
slave-skip-errors = 1062,1053
skip_slave_start = 1
添加完后,重启下mysql,让iptables放过3306端口,再看两边mysql是否可以远程访问.
4.从服务器上开启复制功能
change master to master_host='192.168.10.5',master_user='dbmysql',master_password='123456',master_log_file='mysql-bin.000001',master_log_pos=106;
slave start;
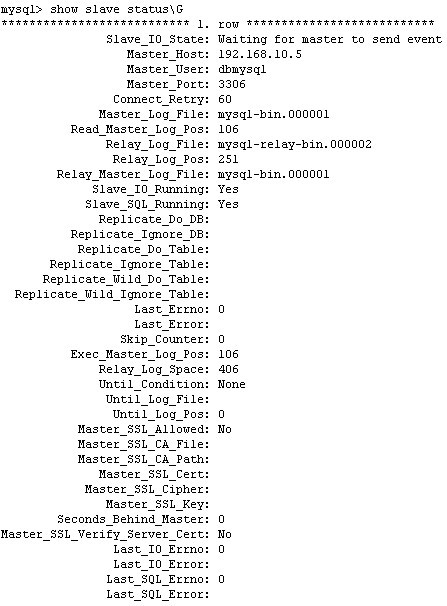
show slave status\G
5.测试
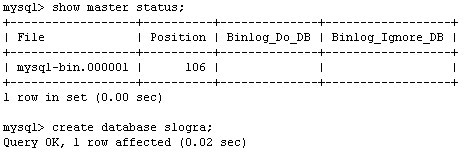
在主服务器上新建个数据库
create database slogra;
再在从服务器上查看有没有同步过来
show databases;
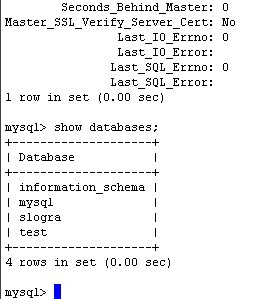
好了,可以看到同步过来了.
参考资料:
http://linux5588.blog.51cto.com/65280/821583
http://www.litvip.com/2011/06/01/291
参考资料:
http://linux5588.blog.51cto.com/65280/821583
http://www.litvip.com/2011/06/01/291


评论: